7.6 Instructions
At times in your routine communications, you will have to convey instructions to a colleague, client, partner, or manager. Instructions are step-by-step explanations of how to perform a task, complete forms, comply with policies, or perform other procedures. For example, you might see instructions during safety training when you are first hired. Or you might see instructions when you first learn to process customer requests or reimbursements. Instructions are widely used when creating step-by-step descriptions for installing and using software.
Instructions serve many different purposes and come in many forms: short emails, standard operating procedures, manuals, user guides, pamphlets, along with webinars and video tutorials. For example, you might find yourself writing instructions for a colleague who will replace you while you are on vacation or one who has to write a business plan. Although they may seem intuitive and simple to write, instructions are some of the worst-written documents you can find. Most of us have probably had many infuriating experiences with badly written instructions. This chapter will show you what professionals consider the best techniques in providing instructions.
An effective set of instructions requires the following:
- clear, precise, and straight-forward writing
- a thorough understanding of the procedure in all its detail
- the ability to put yourself in the place of the reader, the person trying to use your instructions
- the ability to visualize the procedure in detail and to capture that awareness in the steps provided
- willingness to test your instructions on the kind of person you wrote them for
The following video, Instructions Documents: Writing Effecting Steps (2013), reviews the basic of writing instructions.
Planning to Write Instructions
When starting to write a set of instructions, it is important to determine the structure or characteristics of the particular procedure you are going to write about. Here are some steps to follow:
1. Complete a careful audience analysis
Early in the process, define the audience and situation for your instructions. Remember that defining an audience means defining the level of familiarity your readers have with the topic. So envision your real audience, not your ideal one. Doing so will help you focus on the content that a typical reader would need to perform a sequence of tasks.
2. Do a thorough task analysis
Let’s use the term procedure to refer to the whole set of activities your instructions are intended to discuss. A task is a semi-independent group of actions within the procedure: For example, setting the clock on a microwave oven is one task in the big overall procedure of operating a microwave oven.
What tasks are involved in the entire procedure?
• Complete a thorough task analysis by performing the task yourself, if possible
• Group related tasks together
• Determine the number of tasks and identify phases
3. Determine the best approach for the step-by-step section
For most instructions, you can focus on tasks, or you can focus on tools (or features of tools). In a task approach (also known as task orientation) for instructions on using a phone-answering service, for example, you would include these sections:
- Recording your greeting
- Playing back your messages
- Saving your messages
- Forwarding your messages
- Deleting your messages, and so on
These are tasks—the typical things we’d want to do with the machine.
On the other hand, in a tools approach to instructions on using a photocopier, there likely would be sections on how to use specific features:
- Copy button
- Cancel button
- Enlarge/reduce button
- Collate/staple button
- Copy-size button, and so on
If you designed a set of instructions using this plan, you’d write steps for using each button or feature of the photocopier. Instructions using this tools approach are hard to make work. Sometimes, the name of the button doesn’t quite match the task it is associated with; sometimes you have to use more than just one button to accomplish the task. Still, there can be times when the tools/feature approach may be preferable.
4. Design groupings of tasks
Some instructions have only a single task but have many steps within that single task. For example, imagine a set of instructions for assembling a kids’ swing set. In my own experience, there were more than 130 steps! That can be a bit daunting. A good approach is to group similar and related steps into phases, and start renumbering the steps at each new phase. A phase then is a group of similar steps within a single-task procedure. In the swing-set example, setting up the frame would be a phase; anchoring the thing in the ground would be another; assembling the box swing would be still another.
Another example would group common tasks as follows:
- Unpacking and setup tasks
- Installing and customizing tasks
- Basic operating tasks
- Routine maintenance tasks
- Troubleshooting tasks
Common Components of Instructions
The following is a review of the sections you’ll commonly find in instructions. Don’t assume that each one of them must be in the actual instructions you write, nor that they have to be in the order presented here, nor that these are the only sections possible in a set of instructions. Always consider your audience and context first, then adapt your document accordingly.
For an alternative example of a set of instructions, check out Indeed.com’s How to Write a Professional Email.
Introduction: Plan the introduction to your instructions carefully. It might include any of the following (but not necessarily in this order):
- Indicate the specific tasks or procedure to be explained as well as the scope (what will and will not be covered).
- Indicate what the audience needs in terms of knowledge and background to understand the instructions.
- Give a general idea of the procedure and what it accomplishes.
- Indicate the conditions when these instructions should (or should not) be used.
- Give an overview of the contents of the instructions.
General warning, caution, danger notices: Although this may not occur often in business other than in computer programming, instructions must alert readers to the possibility of ruining their equipment, compromising the procedure, and hurting themselves. Regardless, instructions must often emphasize key points or exceptions. For these situations, you use special notices—general notes, warnings, caution and danger notices. General warning, caution, and danger notes will appear following the Introduction, and specific notices will appear immediately before any relevant step.
Remember: When a procedure involves any hazard to humans or animals, or potential for damage, you have a legal and moral responsibility to include these special notices in the opening and in the steps in your document.
Background or theory: At the beginning of certain kinds of instructions (after the introduction), you may need background information related to the procedure. For certain instructions, this background is critical—otherwise, the steps in the procedure make no sense.
• In business contexts, reference to codes, regulations, policies, laws, and other critical documents should be mentioned in the Background.
• Any specific knowledge or skills required to perform the tasks should also be included.
For example, if you were to create instructions for on-boarding a new Uber driver, you would have to mention ride share regulations in the city where your company is doing business.
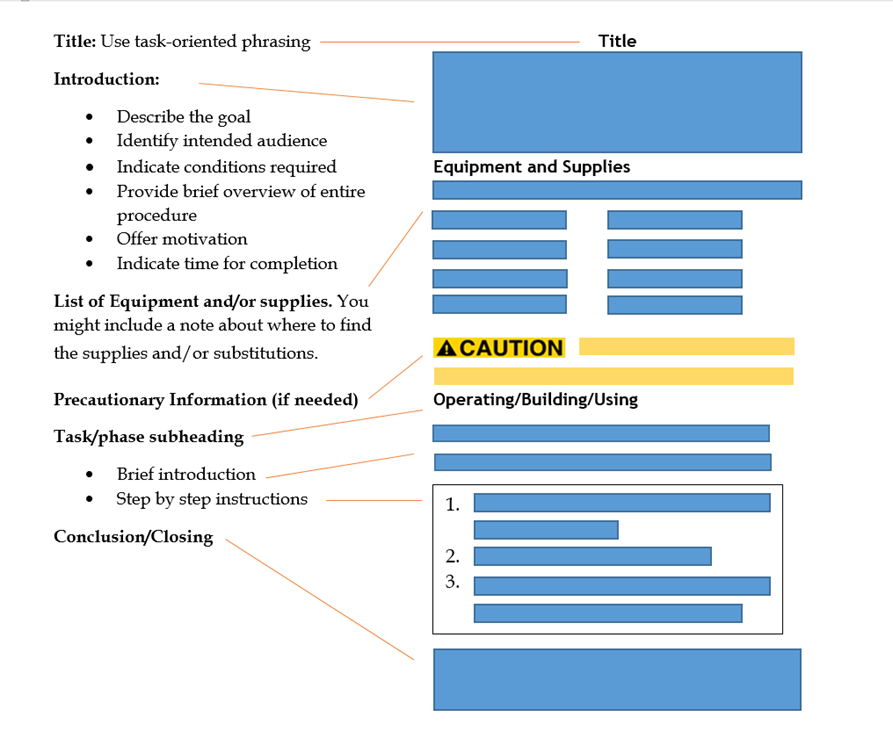
Equipment and supplies: Notice that most instructions include a list of the things you need to gather before you start the procedure. This includes equipment, the tools you use in the procedure (such as software) and supplies, the things that may be consumed in the procedure (such as paper, ink cartridges, etc.). Be sure to include any personal protective equipment (PPE) (such as masks, safety vests), as this equipment is essential to protect readers. In instructions, these typically are listed either in a simple vertical list or in a two-column list. Use the two-column list if you need to add some specifications to some or all of the items—for example, brand names, sizes, amounts, types, model numbers, and so on.
Discussion of the steps: When you get to the actual writing of the steps, keep in mind the following: 1) the structure and format of those steps, 2) supplementary information that might be needed, and 3) the point of view and general writing style.
Though rare in business contexts, include a caution, danger, or warning notice before each step that poses some risk. Otherwise, include helpful information in routine notices. Placement before the step is the most logical placement because you would not want someone to go ahead and perform a hazardous step without first reading the warning, caution, or danger note. Notice how these special notices are used in the McMurrey sample instructions.
Structure and format: Normally, most instructions are formatted as vertical numbered lists. There are some variations, however, as well as some other considerations:
- Fixed-order steps are steps that must be performed in the order presented. For example, if you are directing new hires on how to create login information to access the company intranet, you would present the process in a specific order. These are numbered lists (usually, vertical numbered lists).
- Variable-order steps are steps that can be performed in practically any order. Good examples are those troubleshooting guides that tell you to check this and check that when you are trying to fix something. You can do these kinds of steps in practically any order. With this type, the bulleted list is the appropriate format.
- Alternate steps are those in which two or more ways to accomplish the same step are presented. Alternate steps are also used when various conditions might exist. Use nested bulleted lists with this type, with OR inserted between the alternatives, or include a lead-in indicating that alternatives are about to be presented.
- Nested steps may be used in cases when individual steps within a procedure are rather complex in their own right and need to be broken down into sub-steps. In this case, you indent further and sequence the sub-steps as a, b, c, and so on.
- “Step-less” instructions or Tips can be used when you really cannot use numbered vertical list or provide straightforward instructional-style directing of the reader. Some situations must be so generalized or so variable that steps cannot be described in a strictly chronological order. Think, for example, of a situation when you may be describing tips for leading a team effectively.
Supplementary discussion: Often, it is not enough simply to tell readers to do this or to do that. They need additional explanatory information such as how the thing should look before and after the step; why they should care about doing this step; what principle is behind what they are doing; even more micro-level explanation of the step—discussion of the specific actions that make up the step.
The problem with supplementary discussion, however, is that it can hide the actual step. You want the actual step—the specific actions the reader is to take—to stand out. You don’t want it all buried in a heap of words. There are at least two techniques to avoid this problem: you can split the instruction from the supplement into separate paragraphs; or you can bold the instruction.
Knowledge Check
Writing Style
It is essential that instructions be conveyed using specific and task-focused language.
First, use concrete language to convey the instructions. For example, there is a big difference between Submit your payment for the parking permit by next week and Submit your payment for the parking permit by next Friday, March 15. Your reader will better be able to follow your direction if the information is specific.
Second, avoid using the passive voice as the trend nowadays is to engage the reader using an active verb that is task-focused. The use of the passive voice in instructions can be problematic. For some strange reason, some instructions sound like this: “The Pause button should be depressed in order to stop the display temporarily.” Not only are we worried about the pause button’s mental health, but we wonder who’s supposed to depress the thing (ninjas?). It would be more helpful to indicate when the reader must “press the Pause button.” Consider this example: “The Timer button is then set to 3:00.” Again, one might ask, “is set by whom? Ninjas?” The person following these instructions might think it is simply a reference to some existing state, or she might wonder, “Are they talking to me?” Using the third person can also lead to awkwardness: “The user should then press the Pause button.” Instead, create a direct and active statement: “Set the timer to 3 p.m.” and “Press the pause button.”
Instructions should typically be written using command verb forms (also known as the imperative mood) and using “you” to make it perfectly clear what the reader should do. Here is a useful example that would be familiar to anyone who owns a car:
Step 2: Inflating your automobile tires with air
2.1. After driving to the service station, locate the air compressor and park the car next to it.
2.2. Remove the valve stem caps on all four tires.
2.3. Check the PSI number for your vehicle’s tires.
2.4. Turn on the air compressor. (Insert sufficient coinage if necessary).
CAUTION: Do not over-inflate your tires. Doing so will result in faster tread wear and tear.
2.5. Inflate each tire with air from the compressor.
2.6. Check the tire pressure (or PSI) of each tire and adjust using the tire gauge.
2.7. Recap each valve with the valve stem caps.
Note: Each step (except for step 1) begins with a verb in the present tense–the imperative mood. Step 2.1, begins with a qualifier: “After driving to the service station. . .” The step then goes on to use a command style to explain the step.
Example created by Robin L. Potter
Illustrating Your Instructions
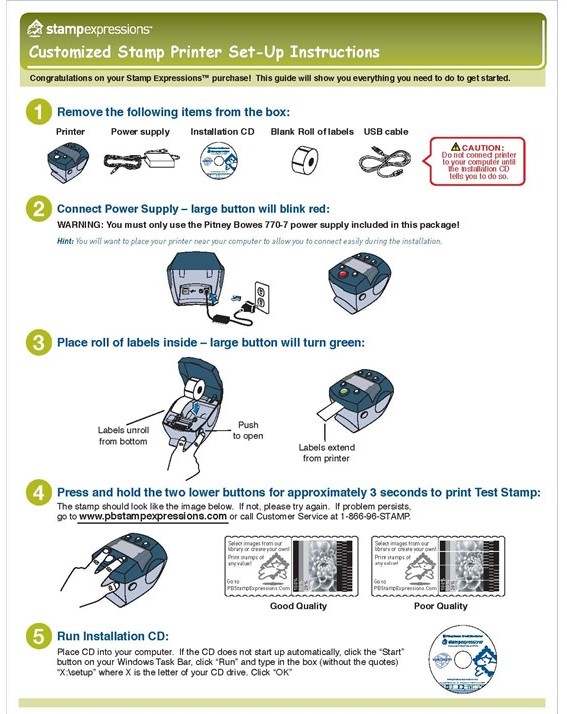
You may have noticed that many companies, like Canon and Ikea, now opt for pictorial formats for instructions. In so doing, they are attempting to minimize language barriers when offering their products in countries around the globe. They are also decreasing their costs for translating instructions and minimizing the potential for language errors and content inaccuracies that can occur through the translation process.
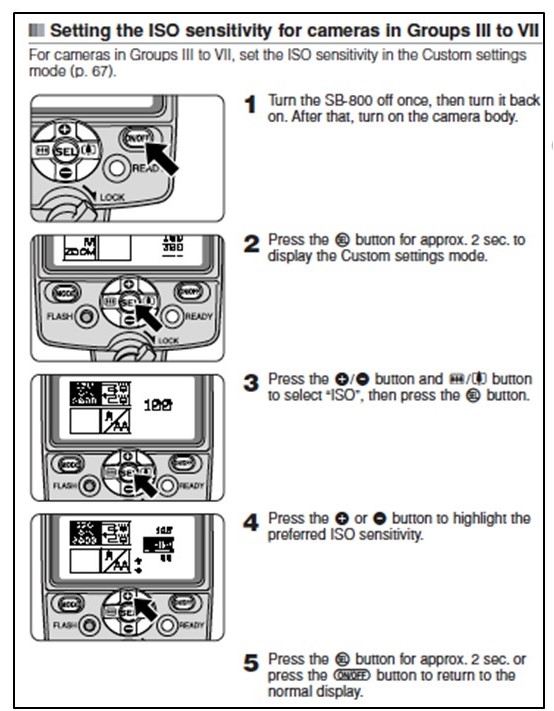
Text-based instructions, however, are still common. Perhaps more than in any other form of business writing, visual aids or visual tutorials are crucial to text-based instructions. Sometimes, words simply cannot explain the step. Illustrations, photographs, screenshots, and the like are often critical to the readers’ ability to visualize what they are supposed to do. Be sure that the visual aids represent the image from the reader’s perspective. Typically, the visual aids are placed immediately below the step described in the text. Adding visual aids to instructions is about the only time that it is acceptable to be redundant in a business document. Incorporate visual aids as instructed in this text with proper captions, and be sure to include sources for the images if you have not created them yourself.
Formatting Your Instructions
Since people rarely want to read instructions, but often have to, format your instructions for reluctant readers. Try to make your reader want to read them, or at least not resistant to the idea of consulting them. A highly readable format using headings, listing, passive space, and visual aids will allow readers who have figured out some of the instructions on their own to skip to the section where they are stuck. Use what you have learned about headings, lists, visuals, and passive space to design the pages that are readable:
Headings: Normally, you’d want headings for any background section you might have, the equipment and supplies section, a general heading for the actual instructions section, and subheadings for the individual tasks or phases within that section.
Lists: Similarly, instructions typically make extensive use of lists, particularly numbered vertical lists for the actual step-by-step explanations. Simple vertical lists or two-column lists are usually good for the equipment and supplies section. In-sentence lists are good whenever you give an overview of things to come.
Special Notices: You may have to alert readers to possibilities in which they may damage their equipment, waste supplies, cause the entire procedure to fail, injure themselves or others—even seriously or fatally. Companies have been sued for lack of these special notices, for poorly written special notices, or for special notices that were out of place. Use text boxes and other visual cues to highlight these notices See special notices for a complete discussion of the proper use of these special notices as well as their format and placement within instructions.
Knowledge Check
As you reread and revise your instructions, check that they do the following:
- Provide an overview of content
- Indicate audience requirements
- Clearly describe the procedure to be explained
- Include a section listing equipment and supplies, if necessary
- Include exact measurements and other values when required; for example, “a few meters” is far less specific than “2.5 meters”
- Use various types of lists wherever appropriate; in particular, use numbered lists for sequential steps
- Use headings and subheadings to divide the main sections and subsections in a logical, coherent order
- Use special notices as appropriate
- Use visual aids to illustrate key actions, objects, and locations
- Provide additional supplementary explanation of the steps as necessary
References
Beilfus, M. (n.d.). Chapter 8: Technical instructions. Technical and professional writing genres. OSU Library. https://open.library.okstate.edu/technicalandprofessionalwriting/chapter/chapter-8/
Georgia State University. (2014). “Post #7: The importance of first impressions. http://sites.gsu.edu/techcomm-fall-2014/2014/10/10/post-7-the-importance-of-first-impressions/
Indeed Editorial Team. (2021, February 22). How to write a professional email. Indeed.com. https://ca.indeed.com/career-advice/career-development/professional-email
McMurrey, D. (1997-2017). Online technical writing: Examples, cases, and models. https://mcmassociates.io/textbook/models.html Creative Commons Attribution 4.0 International License.
McMurrey, D. (1997-2017). Online technical writing: Special notices. https://mcmassociates.io/textbook/notices.html Creative Commons Attribution 4.0 International License.
umnWritingStudies. (2013). Instruction documents. Writing effective steps [Video]. Youtube. https://www.youtube.com/watch?v=h7Qn4GkpcLg&t=192s
Wood, O. (2013). What Makes a Good Instruction Manual. https://oliverwoodphotography.wordpress.com/2013/05/02/what-makes-a-good-instruction-manual/
