Unit 35: Visual Aids
Learning Objectives

After studying this unit, you will be able to
-
-
- identify when and how visual aids will enhance a presentation
- identify the different types of visual aids
- identify effective and ineffective use of visual aids
- apply basic design principles to slide design
- identify best practices to incorporating visual aids in a presentation
-
Introduction
Visual aids can be a very powerful tool to enhance the impact of your presentations. Words and images presented in different formats can appeal directly to your audience’s imagination, adding power to your spoken words.
Learning how to create effective visuals that resonate with your audience is important for a quality presentation. Understanding basic principles of how visual information is processed alone and in combination with audio information can make or break your visuals’ effectiveness and impact. Incorporating visuals into your speech that complement your words rather than stand in place of them or distract from them, will set you apart from other presenters, increase your credibility, and make a bigger and more memorable impact on your audience. A brief overview of the importance of visual aids is presented below. Part II of the Module noted in the video is provided later on this page.
Types of Visual Aids
When selecting a visual aid, it is important to choose one appropriate to the information being presented. Information generally falls into one of two categories:
- Statistical: to help the audience visualize relationships between numbers, use pie charts, line charts, and bar charts.
- Illustrative: to visually describe an idea or concept, use pictures or symbols.
Keep in mind the size of your audience, the type of room in which you will be presenting, and how best to support your presentation when selecting a visual aid. Think about using a variety of visual aids in your presentation: PowerPoint, projectors, white/blackboard, flipcharts, handouts, or video sequences. Be creative and deliberate in your choice of visual aid to achieve the most impact. Let’s view the following video before looking specifically at different types of visual aids.
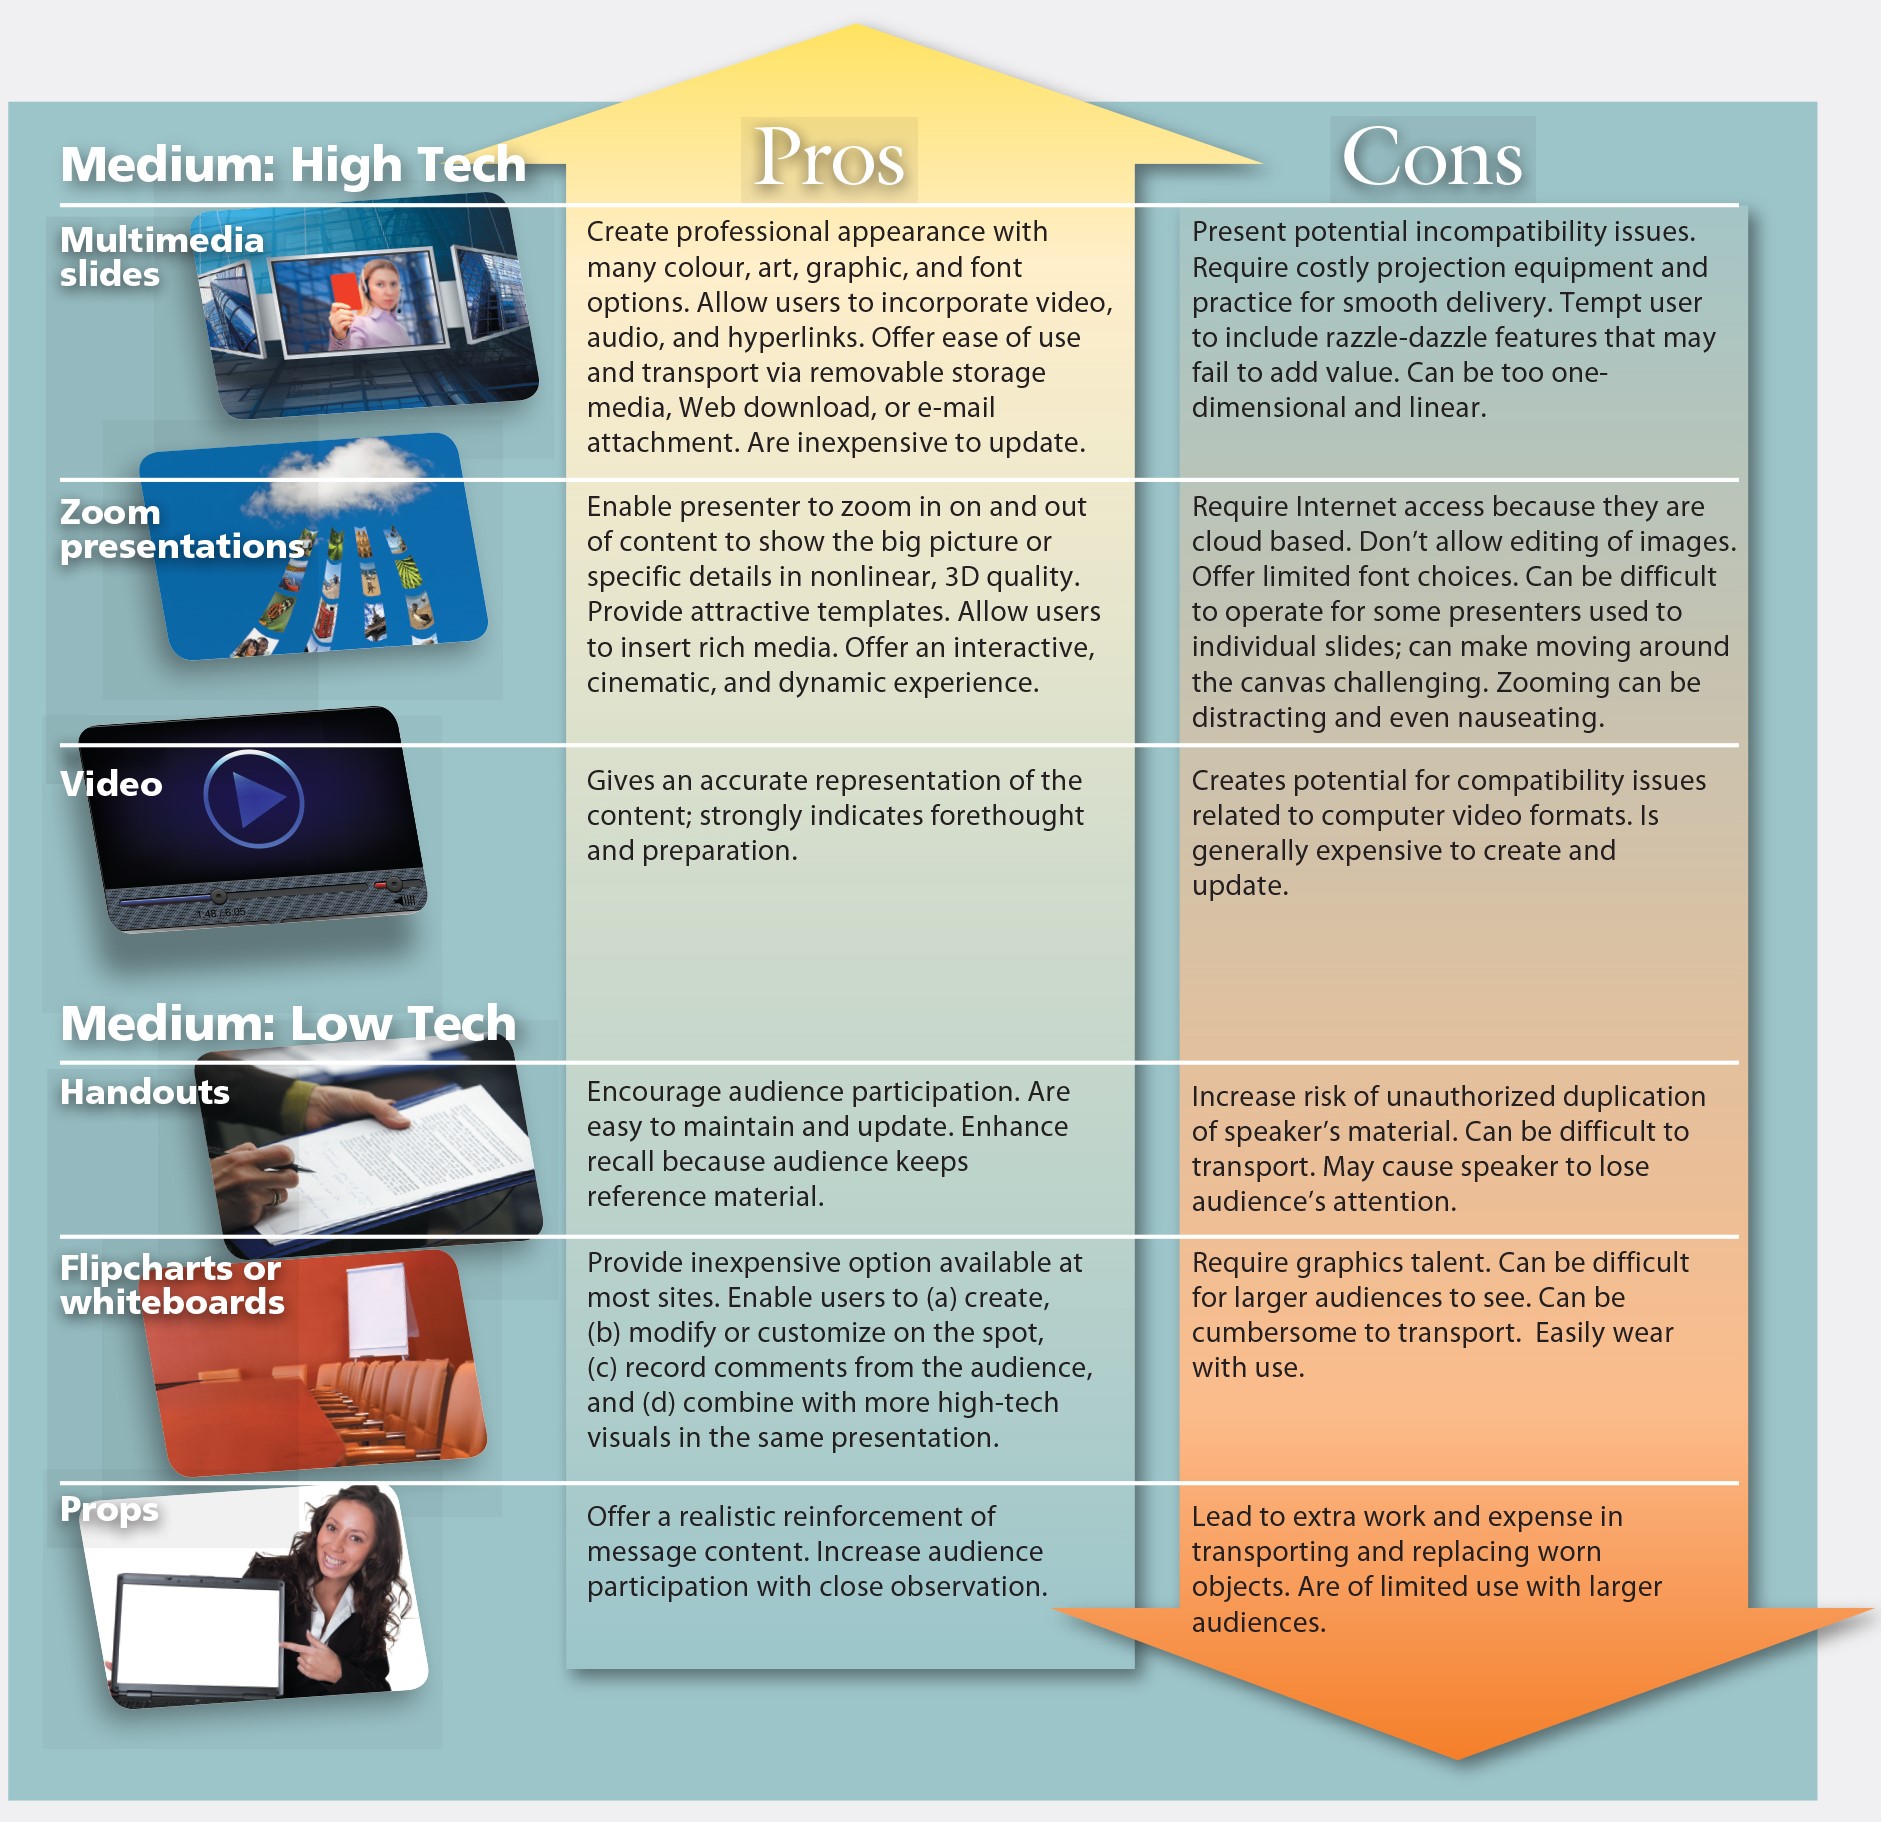
PowerPoint (or equivalent)
Microsoft PowerPoint is probably now the most commonly used form of visual aid. PowerPoint is a computer program that allows you to create and show slides to support a presentation. You can combine text, graphics and multimedia content to create professional presentations. As a presentation tool PowerPoint can be used to:
- organize and structure your presentation;
- create a professional and consistent format;
- provide an illustrative backdrop for the content of your presentation;
- animate your slides to give them greater visual impact.
PowerPoint has become enormously popular and you are likely to have seen it used by your lecturers and fellow students. Learning to present with PowerPoint will increase your employability. Used well, PowerPoint can improve the clarity of your presentations and help you to illustrate your message and engage your audience. However, it can have the opposite effect. Table 35.1 presents the general principles.
Table 35.1 General PowerPoint Principles
| Do | Don’t |
| use a big enough font (minimum 20pt) | make it so small you can’t read it |
| keep the background simple | use a fussy background image |
| use animations when appropriate | but don’t over-do the animation – it gets distracting |
| make things visual | use endless slides of bulleted lists that all look the same |
| direct your audience’s attention to slides containing key information | just read out the text on the slides |
| give your audience time to read the information on your slides |
Overhead projector slides/transparencies
Overhead projector slides/transparencies are displayed on the overhead projector (OHP) – a very useful tool found in most lecture and seminar rooms. The OHP projects and enlarges your slides onto a screen or wall without requiring the lights to be dimmed. You can produce your slides in three ways:
- pre-prepared slides: these can be words or images either handwritten/drawn or produced on a computer;
- spontaneously produced slides: these can be written as you speak to illustrate your points or to record comments from the audience;
- a mixture of each: try adding to pre-prepared slides when making your presentation to show movement, highlight change or signal detailed interrelationships.
Make sure that the text on your slides is large enough to be read from the back of the room. A useful rule of thumb is to use 18 point text if you are producing slides with text on a computer. This should also help reduce the amount of information on each slide. Avoid giving your audience too much text or overly complicated diagrams to read as this limits their ability to listen. Try to avoid lists of abstract words as these can be misleading or uninformative.
White or blackboard
White or blackboards can be very useful to help explain the sequence of ideas or routines, particularly in the sciences. Use them to clarify your title or to record your key points as you introduce your presentation (this will give you a fixed list to help you recap as you go along). Rather than expecting the audience to follow your spoken description of an experiment or process, write each stage on the board, including any complex terminology or precise references to help your audience take accurate notes. However, once you have written something on the board you will either have to leave it there or rub it off – both can be distracting to your audience. Check to make sure your audience has taken down a reference before rubbing it off – there is nothing more frustrating than not being given enough time! Avoid leaving out-of-date material from an earlier point of your presentation on the board as this might confuse your audience. If you do need to write ‘live’, check that your audience can read your writing.
Paper handouts
Handouts are incredibly useful. Use a handout if your information is too detailed to fit on a slide or if you want your audience to have a full record of your findings. Consider the merits of passing around your handouts at the beginning, middle, and end of a presentation. Given too early and they may prove a distraction. Given too late and your audience may have taken too many unnecessary notes. Given out in the middle and your audience will inevitably read rather than listen. One powerful way of avoiding these pitfalls is to give out incomplete handouts at key stages during your presentation. You can then highlight the missing details vocally, encouraging your audience to fill in the gaps.
Flip chart
A flip chart is a large pad of paper on a stand. It is a very useful and flexible way of recording information during your presentation – you can even use pre-prepared sheets for key points. Record information as you go along, keeping one main idea to each sheet. Flip back through the pad to help you recap your main points. Use the turning of a page to show progression from point to point. Remember to make your writing clear and readable and your diagrams as simple as possible.
Video
Video gives you a chance to show stimulating visual information. Use video to bring movement, pictures and sound into your presentation. Always make sure that the clip is directly relevant to your content. Tell your audience what to look for. Avoid showing any more films than you need.
Artifacts or props
Sometimes it can be very useful to use artifacts or props when making a presentation. If you bring an artifact with you, make sure that the object can be seen and be prepared to pass it around a small group or move to different areas of a large room to help your audience view it in detail. Remember that this will take time and that when an audience is immersed in looking at an object, they will find it hard to listen to your talk. Conceal large props until you need them; they might distract your audience’s attention.
Knowledge Check
Knowledge Check
When to Use Visual Aids
Words and images can be used throughout your presentation from the introduction to the conclusion. However, remember to restrict their use to key moments in your presentation; an overuse of visual aids can be hard to follow.
Think about using visual aids at the following times:
Introduction
- display the title of your presentation;
- define particular technical terms or units;
- indicate a structure to your presentation by listing your main points;
- display an image that encapsulates your theme(s);
- highlight a question you intend to answer during the course of your presentation;
Main points
- highlight new points with an appropriate image or phrase;
- support technical information with clearly displayed data;
- indicate sequence by linking points together;
- offer evidence from your research to support your argument;
Conclusion
- summarise your main points on a slide;
- present your conclusion in a succinct phrase or image;
- display your key references to allow your audience to read more on your topic.
Designing Visual Aids
There are many different rules for designing visual aids, some of which will apply directly to different kinds of equipment. In general, sticking to the following guidelines will produce high-quality visual images.
- Help the audience quickly understand the visual.

Figure 35.2: Using the guidelines will help you produce effective visuals for your presentations (Business Communication, 2019).
- use one simple idea for each visual;
- make the text and diagrams clear and readable;
- avoid cluttering the image;
- keep your images consistent (use the same font, titles, layout, etc. for each image);
- make sure your images are of high quality (check for spelling and other errors).
2. Use the 3 T’s
When using visual aids in your presentation, follow the three T’s: touch turn, and talk.
- TOUCH (or at least gesture toward) and look at the chart or screen; read it silently to yourself to give the audience time to read it.
- TURN towards the audience.
- TALK to the audience, not to your visual.
3. Be aware of your position.
Stand to the left of the screen or display to avoid blocking anyone’s view. Avoid stepping in front of the visuals unless you are adding something to a flip chart; it’s very difficult to write well from the side. When gesturing towards the visuals, keep your hands open and do not point. Avoid staring at the visual aids as well; you need to maintain a connection to the audience through eye contact. At all times, remember that you are still the presenter! So, don’t hide behind your visuals. You are not there to read a PowerPoint to the audience; add value to each point as you cover it.
4. Know how to use the visual aid.
There is nothing worse than a presenter struggling with their visual aids. Be familiar enough with your tools to ensure that you won’t be thrown if something goes wrong. Confident use of visual aids will help marry them to your spoken presentation helping them become part of an impressive performance.
If properly prepared and implemented, visual aids can be an invaluable tool for getting your point across clearly and professionally. Follow these guidelines for maximum impact and improved audience retention!
Knowledge Check
Summary
Use visual aids to display complex information clearly and introduce variety into your delivery technique. Make sure that you are familiar with the equipment required to create and display visual aids, and deploy visual aids creatively in your presentations mixing techniques and media to create an impact. Figure 35.3 provides a visual summary of how to incorporate visual aids into your presentation.

Key Takeaway

-
-
- Be sure that any visual aid you use adds to what you are saying. Slides should be brief, easy to understand and complement your message.
- When designing slides make sure they are clear and visible to the entire audience.
- Practice your presentation with your visual aids and remember to speak to your audience, not to your visual aid or the screen
- Use a variety of visual aids in your presentation to engage your audience
-
Exercises 2.1

-
-
- Using the 6×6 Rule, write a series of bullets suitable for use on a PowerPoint slide that summarizes the following information.
-
We have four specific corporate goals in the year ahead. The first is to introduce new product lines, including cardio equipment. Our second goal is to see our company become a worldwide leader. However, if we are to achieve this goal, our company must expand geographically. Plans are now underway to establish operations in South America and Europe. Finally, we would like to continue 20 percent and higher sales growth.
References
COMMpadres Media. (2016). Presentation aids [Video file]. Retrieved from https://www.youtube.com/watch?v=ZC4q6lykPUQ
Guffey, M., Loewry, D., & Griffin, E. (2019). Business communication: Process and product (6th ed.). Toronto, ON: Nelson Education. Retrieved from http://www.cengage.com/cgi-wadsworth/course_products_wp.pl?fid=M20b&product_isbn_issn=9780176531393&template=NELSON
UMW QEP. (2015). The purpose of visual aid and effective design tips [Visual file]. Retrieved from https://www.youtube.com/watch?v=_LPpt2_78LM
UMW QEP. (2015). The importance of effective visual aids [Video file]. Retrieved from https://www.youtube.com/watch?v=2ShnDmuueI0&t=2s
University of Leicester. (n.d.). Using visual aid. Presentation skills. Retrieved from https://www.le.ac.uk/oerresources/ssds/presentationskills/page_58.htm
